Helium IoT Network: Deploy your own Helium LoRaWAN Network Server

Wednesday, November 29, 2023

Helium IoT Network: Deploy your own Helium LoRaWAN Network Server

Wednesday, November 29, 2023

Helium IoT Network: Deploy your own Helium LoRaWAN Network Server

Wednesday, November 29, 2023

This is the second in a series of posts detailing how to get started using the Helium IoT LoRaWAN network. In this post, I will walk you through deploying and configuring Chirpstack, an open source LoRaWAN Network Server(LNS), to work with the Helium IoT network. After you are finished, you will be able to onboard a device in the US915 LoRaWAN region. You can view the first post on why you would want to use this network and other options if you’re not interested in deploying your own LNS here.

Requirements

You will need to have these five things below before starting this guide to complete a fully working setup.

Steps

  1. Deploy Server Instance

  2. Deploy Chirpstack

  3. Configure IoT Config Service

  4. Adding a Device

Step 1. Deploy Server Instance

Although I’ll be deploying on Vultr, the steps will be very similar on any other VPS/Compute provider. I am not affiliated with Vultr in any way, I just enjoy the simplicity and performance of their service. You can use any hosting service you like, and the steps should be the same if you pick the same server OS.

Let’s deploy our server instance first. Visit https://my.vultr.com/deploy to start.

Select your server type and architecture.

Next, select the location closest to the region you will be servicing. In this case, it will be in the US.

Next, select the Operating System, we’ll be using Ubuntu 22.04 LTS x64.

Next, we’ll select the server size; the smallest will be plenty to start.

You can leave the defaults for the rest, although auto backups are not required.

Once your server is ready, visit the instance details page. We’ll grab the server IP Address and root password from this page. For an actual deployment, using the root user is not recommended. We’ll only use root because it’s the quickest way to demonstrate this setup.

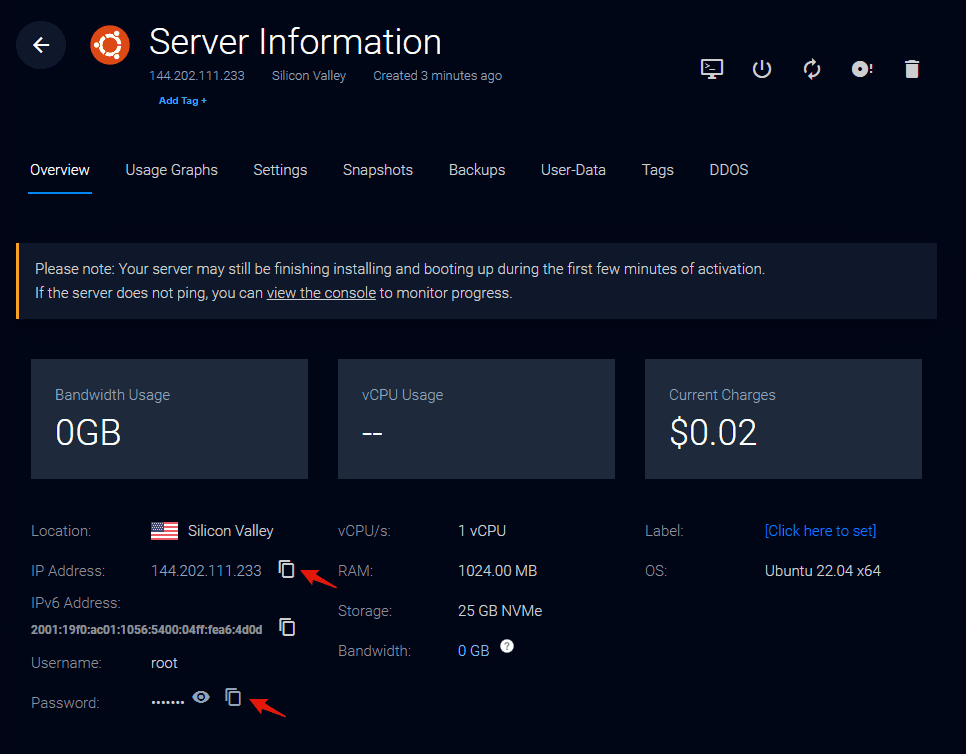
Let’s SSH into the server using the IP and root password provided.

$ ssh root@144.202.111.233
The authenticity of host '144.202.111.233 (144.202.111.233)' can't be established.
ED25519 key fingerprint is SHA256:T9pO/TcYGcwPeYuxWGalkxQtXalYo6nNS+xe+gS3KW4.
This key is not known by any other names
Are you sure you want to continue connecting (yes/no/[fingerprint])? yes
Warning: Permanently added '144.202.111.233' (ED25519) to the list of known hosts.
root@144.202.111.233's password: 
Welcome to Ubuntu 22.04.3 LTS (GNU/Linux 5.15.0-84-generic x86_64)

 * Documentation:  https://help.ubuntu.com
 * Management:     https://landscape.canonical.com
 * Support:        https://ubuntu.com/advantage

  System information as of Thu Nov 16 01:48:06 AM UTC 2023

  System load:             0.0
  Usage of /:              27.4% of 22.88GB
  Memory usage:            22%
  Swap usage:              0%
  Processes:               119
  Users logged in:         0
  IPv4 address for enp1s0: 144.202.111.233
  IPv6 address for enp1s0: 2001:19f0:ac01:1056:5400:4ff:fea6:4d0d


Expanded Security Maintenance for Applications is not enabled.

24 updates can be applied immediately.
To see these additional updates run: apt list --upgradable

Enable ESM Apps to receive additional future security updates.
See https://ubuntu.com/esm or run: sudo pro status


The list of available updates is more than a week old.
To check for new updates run: sudo apt update


The programs included with the Ubuntu system are free software;
the exact distribution terms for each program are described in the
individual files in /usr/share/doc/*/copyright.

Ubuntu comes with ABSOLUTELY NO WARRANTY, to the extent permitted by
applicable law.

root@vultr:~#

Step 2. Deploy Chirpstack

Now that you’re logged into your server instance let’s deploy Chirpstack.

First, we’ll install docker.

root@vultr:~# sudo apt -y install apt-transport-https ca-certificates curl software-properties-common
root@vultr:~# curl -fsSL https://download.docker.com/linux/ubuntu/gpg | sudo gpg --dearmor -o /usr/share/keyrings/docker-archive-keyring.gpg
root@vultr:~# echo "deb [arch=$(dpkg --print-architecture) signed-by=/usr/share/keyrings/docker-archive-keyring.gpg] https://download.docker.com/linux/ubuntu $(lsb_release -cs) stable" | sudo tee /etc/apt/sources.list.d/docker.list > /dev/null
root@vultr:~# sudo apt update && apt-cache policy docker-ce && sudo apt -y install docker-ce

And then docker compose.

root@vultr:~# mkdir -p ~/.docker/cli-plugins/
root@vultr:~# curl -SL https://github.com/docker/compose/releases/download/v2.3.3/docker-compose-linux-x86_64 -o ~/.docker/cli-plugins/docker-compose
root@vultr:~# chmod +x ~/.docker/cli-plugins/docker-compose

Next, we’re going to clone the Chirpstack docker compose configuration files.

root@vultr:~# git clone https://github.com/chirpstack/chirpstack-docker.git
root@vultr:~# cd chirpstack-docker

Since we are deploying in the US LoRaWAN region, we will change the default gateway bridge starting on line 22 from EU868 to US915 in thedocker-compose.ymlfile in the current directory.

chirpstack-gateway-bridge:
    image: chirpstack/chirpstack-gateway-bridge:4
    restart: unless-stopped
    ports:
      - 1700:1700/udp
    volumes:
      - ./configuration/chirpstack-gateway-bridge:/etc/chirpstack-gateway-bridge
    environment:
      - INTEGRATION__MQTT__EVENT_TOPIC_TEMPLATE=eu868/gateway/{{ .GatewayID }}/event/{{ .EventType }}
      - INTEGRATION__MQTT__STATE_TOPIC_TEMPLATE=eu868/gateway/{{ .GatewayID }}/state/{{ .StateType }}
      - INTEGRATION__MQTT__COMMAND_TOPIC_TEMPLATE=eu868/gateway/{{ .GatewayID }}/command/#
    depends_on:
      - mosquito

To this:

chirpstack-gateway-bridge-us915:
    image: chirpstack/chirpstack-gateway-bridge:4
    restart: unless-stopped
    ports:
      - 1700:1700/udp
    volumes:
      - ./configuration/chirpstack-gateway-bridge:/etc/chirpstack-gateway-bridge
    environment:
      - INTEGRATION__MQTT__EVENT_TOPIC_TEMPLATE=us915_1/gateway/{{ .GatewayID }}/event/{{ .EventType }}
      - INTEGRATION__MQTT__STATE_TOPIC_TEMPLATE=us915_1/gateway/{{ .GatewayID }}/state/{{ .StateType }}
      - INTEGRATION__MQTT__COMMAND_TOPIC_TEMPLATE=us915_1/gateway/{{ .GatewayID }}/command/#
    depends_on:
      - mosquito

Next, we must modify the network section and add a new gateway section in the file below. Use the Helium net ID provided and replace <start_addr> with the starting DevAddr you received when you purchased your OUI.

configuration/chirpstack/chirpstack.toml

[network]
  #Helium Net ID
  net_id="00003C"
  dev_addr_prefixes=["<start_addr>/29"]
  enabled_regions=[
    "us915_1",
  ]
[gateway]
  allow_unknown_gateways=true

Finally, start up the Chirpstack services.

root@vultr:~/chirpstack-docker# docker compose up

Visit the web UI at http://<your_server_ip>:8080/#/login

Use these credentials to log in:

Username / email: admin

Password: admin

If you want to shut down the Chirpstack services later, use Ctrl-C.

Step 3. Configuring IoT Config Service

The IoT Config Service provides configuration settings and values for the LoRaWAN IoT Helium network. We will next download a CLI utility to tell the IoT Config Service how to communicate with our Chirpstack LNS Server and route our device data.

Let’s download the CLI utility to start.

Go to https://github.com/helium/helium-config-service-cli/releases/latest and find the appropriate release for your local computer.

Next, open a terminal window and use wget to download the file to the current directory, unzip or untar, then enter the directory.

On Linux:

k3nt@k3nt:~$ wget https://github.com/helium/helium-config-service-cli/releases/download/0.2.1/helium-config-service-cli-0.2.1-x86-64-linux.tar.gz
k3nt@k3nt:~$ tar -xvf helium-config-service-cli-0.2.1-x86-64-linux.tar.gz
k3nt@k3nt:~$ cd helium-config-service-cli-0.2.1-x86-64-linux

First, we will set some environment variables that will be used with the CLI for the rest of the commands. This command will interactively ask you for each of the required fields. Use the values provided below for host and net ID, and replace the <> placeholders with your specific values. You must have your delegate keypair.bin on your local computer and specify its location path below. Max copies define how many gateways you want to receive a device uplink from if it is heard by more than one. This can be useful for geolocating applications.

k3nt@k3nt:~/helium-config-service-cli-0.2.1-x86-64-linux$ ./helium-config-service-cli env init
----- Leave blank to ignore...
Config Service Host: http://mainnet-config.helium.io:6080/
Keypair Location: <your_delegate_kepair_filename>.bin
----- Enter all zeros to ignore...
Net ID: C00053
----- Enter zero to ignore...
Assigned OUI: <your_OUI_number>
Default Max Copies: <max_uplink_copies_you_are_willing_to_purchase>

Put these in your environment
------------------------------------
HELIUM_CONFIG_HOST=http://mainnet-config.helium.io:6080/
HELIUM_KEYPAIR_BIN=<your_delegate_kepair_filename>.bin
HELIUM_NET_ID=C00053
HELIUM_OUI=<your_OUI_number>
HELIUM_MAX_COPIES=<max_uplink_copies_you_are_willing_to_purchase>

Use the following command below to add the environment variables to your shell environment.

export HELIUM_CONFIG_HOST=http://mainnet-config.helium.io:6080/ \
HELIUM_KEYPAIR_BIN=<your_delegate_kepair_filename>.bin \
HELIUM_NET_ID=C00053 \
HELIUM_OUI=<your_OUI_number>

We’ll start by telling IoT Config Service to create a route ID for our OUI. We’ll use this ID in all our commands to let the Config Service know which configuration we are referring to.

k3nt@k3nt:~/helium-config-service-cli-0.2.1-x86-64-linux$ ./helium-config-service-cli route new --commit
created route <your_route_id>
{
  "id": <your_route_id>,
  "net_id": "C00053",
  "oui": <your_OUI_number>,
  "server": {
    "host": "",
    "port": 0,
    "protocol": {
      "type"

Next, let's tell the config server the host address of our LNS server. This is the IP address of your Vultr instance.

k3nt@k3nt:~/helium-config-service-cli-0.2.1-x86-64-linux$ ./helium-config-service-cli route update server --host <your_server_ip> --port 1700 --route-id <your_route_id> --commit
Updated <your_route_id>
{
  "id": <your_route_id>,
  "net_id": "C00053",
  "oui": <your_OUI_number>,
  "server": {
    "host": <your_server_ip>,
    "port": 1700,
    "protocol": {
      "type"

Next, set the GWMP region. This tells the config service which regions of the world we want routed to our LNS server. We’ll just be doing US915 for North America here, but you can repeat this for any other regions you wish to support. For each additional region you add, be sure to match the configuration port in your Chirpstack config.

k3nt@k3nt:~/helium-config-service-cli-0.2.1-x86-64-linux$ ./helium-config-service-cli route update add-gwmp-region --route-id <your_route_id> us915 1700 --commit
Updated <your_route_id>
{
  "id": <your_route_id>,
  "net_id": "C00053",
  "oui": <your_OUI_number>,
  "server": {
    "host": <your_server_ip>,
    "port": 1700,
    "protocol": {
      "type": "gwmp",
      "mapping": {
        "US915"

Next, we’ll tell the config service which DevAddr range to assign to our route. Your DevAddr range will be supplied to you when you purchase your OUI. See the docs here for more information on what DevAddrs are.

k3nt@k3nt:~/helium-config-service-cli-0.2.1-x86-64-linux$ ./helium-config-service-cli route devaddrs add -s <start_dev_addr_range> -e <end_dev_addr_range> --route-id <your_route_id> --commit
added DevaddrRange { route_id: <your_route_id>, start_addr: HexField(<your_start>), end_addr: HexField(<your_end>

Last, we need to tell the Config Service where to route our first LoRaWAN device packets. We’ll just be specifying the App/Join and Dev EUI here; when you add the device in Chirpstack, you will either add or create the AppKey there.

k3nt@k3nt:~/helium-config-service-cli-0.2.1-x86-64-linux$ ./helium-config-service-cli route euis add --dev-eui 6f424119044ef412 --app-eui cabc95d647198f17 --route-id <your_route_id> --commit
added Eui { route_id: <your_route_id>, app_eui: HexField(5420888375714294457), dev_eui: HexField(14347179399913005852) } to <your_route_id>

We have now given the Config Service enough information to route the packets for a single US915 LoRaWAN device to our LNS using the Helium IoT network.

Step 4. Adding a Device

The very last step is to add the device in Chirpstack.

To do this, we need to do three things.

First, we need to create a device profile. This specifies things like the LoRaWAN device region, version, and class.

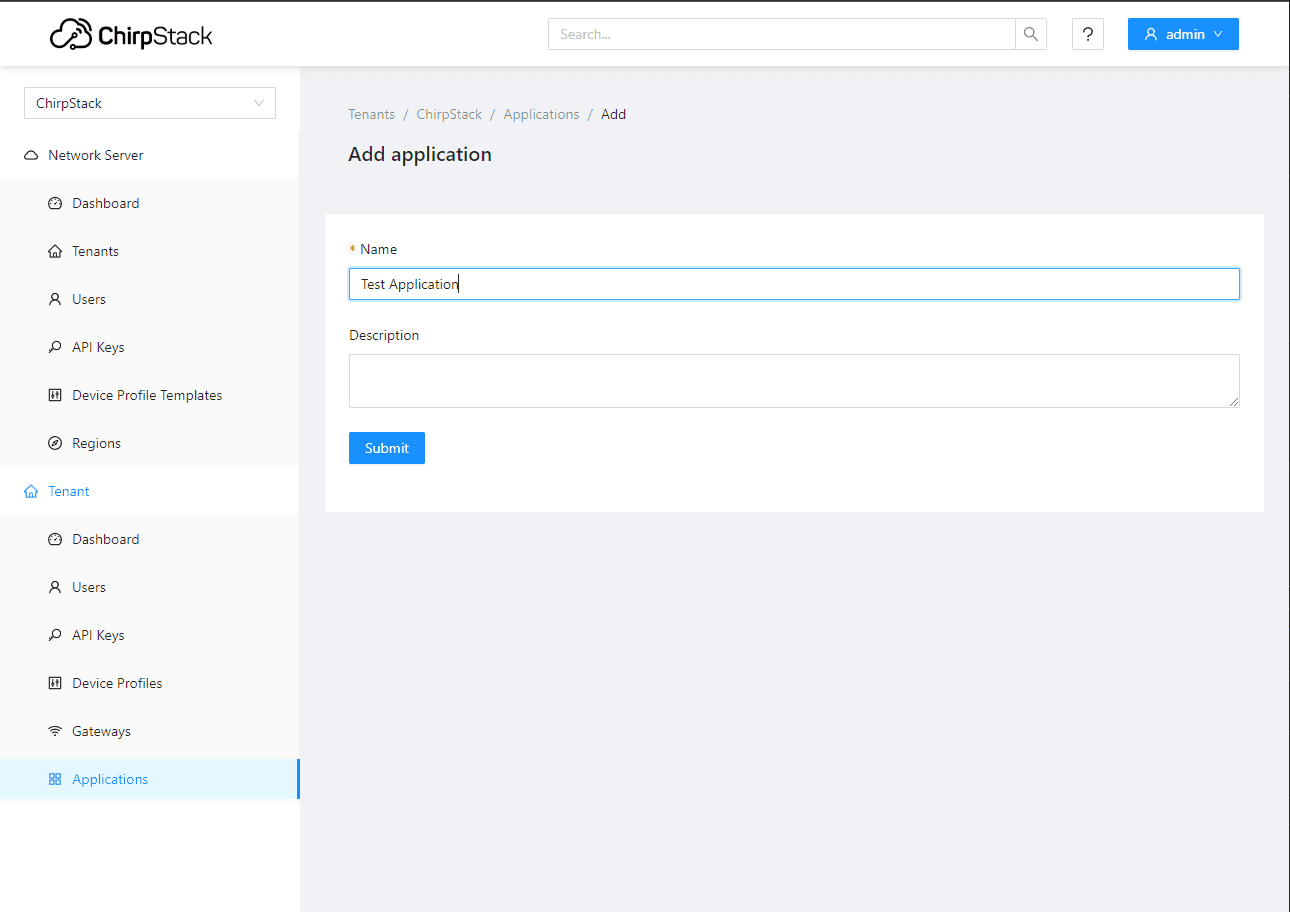
Next, we need to create an application. Devices are grouped by applications in Chirpstack.

Last, we will add the device to the application with the App/Join EUI and DevEUI we used above.

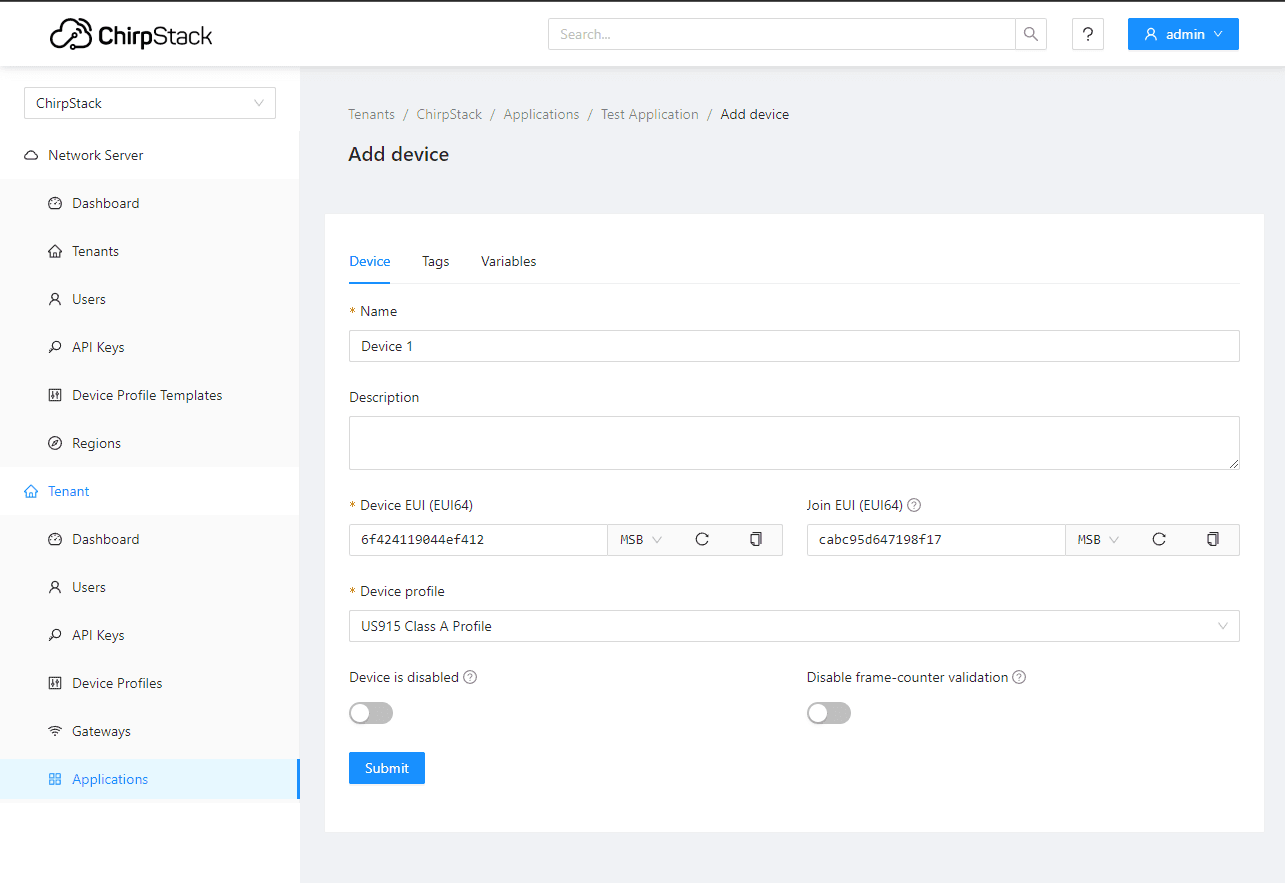
Finally, add or create an AppKey for your device.

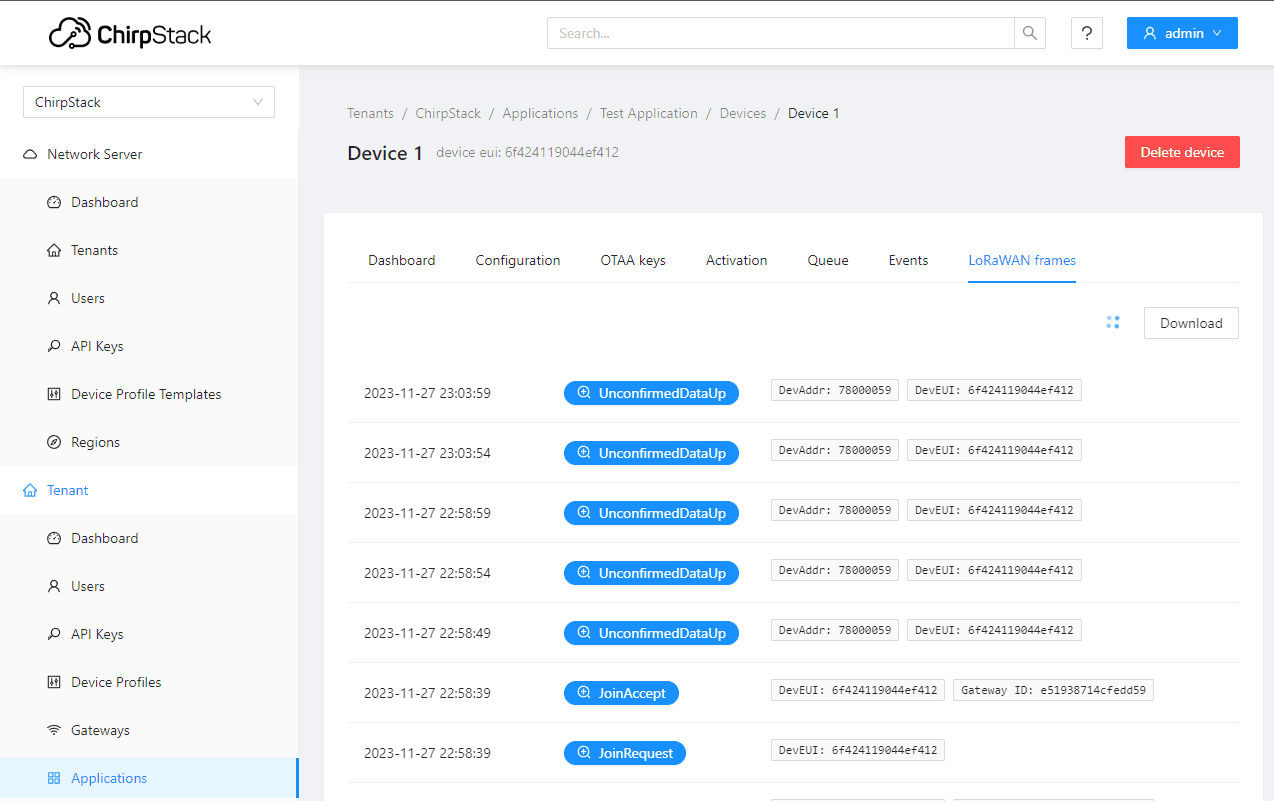
Initiate a join on your device, and you should see frame events in this view.

You have just deployed your very own Helium LoRaWAN network server. Nice work!

If you need help, join us in the Helium Discord server and ask away in the #openlns channel.

sign up for future posts